Hearing loud sounds coming from the ductwork that connects to your home’s HVAC system is to be expected. Whether it’s coming from the supply duct or the return air channels, the noise is probably the result of normal fan operation. But if the low whirring noise becomes distorted and amplified, you shouldn’t just put up with it. Instead, you ought to learn how to reduce the return air noise yourself.
As it happens, most of the odd sounds that might come from the return air ductwork can be fixed with some basic maintenance work. You’ll just have to make sure the system is clean enough for the air to pass through it.
Conversely, you might have to reduce the noise by putting some sound-absorbing materials into the ducts. Of course, before we can discuss these techniques, you should have a better understanding of the role return air ducts play in the larger system.
A Crash Course on Ventilation and the Role of Return Air
To deal with the noise coming from your return air vents, you’ll need to know what purpose they serve. Namely, return air is the air that has already passed through the room and lost its thermic qualities. As the name suggests, the air is now in the ducts on its way back to the HVAC system for additional conditioning.
It will be filtered and heated or cooled, depending on the settings on your AC unit. After that, the air will rejoin the ventilation system in the building, now traveling through the supply lines. However, if you’re already sure the noise you’re dealing with is coming from the return air ductwork, you’ll want to familiarize yourself with that part of the system.
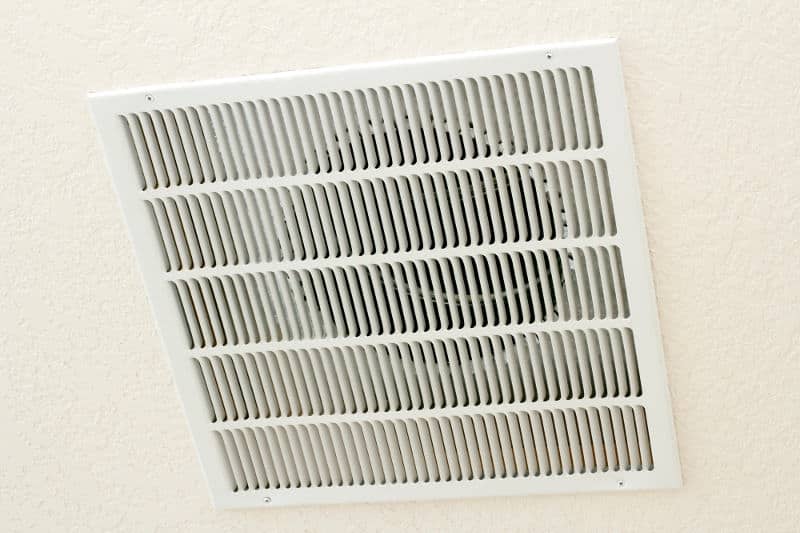
Typically, return air vents look like this — though the supply vents can look fairly similar. To distinguish one from the other, you should simply put your hand over the grille. If you feel a breeze entering the room — that’s the supply. On the other hand, if you feel a pulling sensation — you’re dealing with a return air vent.
Behind that metal cover, you’ll find the beginning of the duct system with a filter covering one wall. The others will either be exposed or covered with a thin layer of insulation called a duct liner. If you pop the filter off, you’ll probably see the fan that pulls the air in and pushes it toward its final destination.
As we have established, that destination will likely be an outdoor AC unit, a basement furnace, or a heat exchanger that’s located inside the ducts. Many of these systems also have an AC coil that lowers the pressure inside the ductwork.
What Makes Some Return Air Vents So Noisy?
Most of the potential causes of noise you’ll be dealing with will be the result of heightened pressure inside the return air ducts. After all, the system can only work properly if the fans that are pulling the air in are stronger than the resistance inside the ducts. That’s why any obstructions in the channels can significantly impair the functioning of the ventilation system.
Of course, having to push past these hurdles will naturally result in noise. A fully functional and open ventilation system would produce a noise level of about 50 decibels or so. That’s a very low hum — and even that will only be audible to those who are sitting right next to the vent. But let’s say your HVAC system is working through restrictions such as:
- A clogged grille with shuttered louvers that don’t allow air to pass
- A dirty filter and duct interior
- Improperly installed ductwork
- A lack of a duct liner
- Ducts that are too narrow to handle the volume of air they’re processing
In that case, the volume of sound you might hear might even cross 70 decibels. That would certainly become annoying in the long run, if not detrimental to your hearing.
Needless to say, solving this issue should be a simple matter of making sure the vent is unobstructed. So let’s see how you might do that.
How to Reduce Noise From a Return Air Vent
The best way to go about reducing the amount of noise your return air vent is making is to troubleshoot each section of the ductwork as you come across it. That means starting with the grille cover and working your way down the line toward the HVAC unit. With that in mind, let’s get into it.
1. Inspect the Grille Cover
Naturally, the first thing you’ll want to do is get close to the grille covering the return air duct. Examine it for dirt and vibrations. If the airflow is strong enough, it might make the individual louvers on the cover flutter, producing a singing sound. That just means that the angles they’re set at are resisting the airflow.
Taking a pair of pliers and straightening the louvers out as shown in the video should do the trick. Basically, you want to get the grille as open as possible. Of course, some covers have adjustable louvers so you may not need to get the pliers involved.
In any case, changing the angle of the louvers should eliminate that slight buzzing sound you’d hear if they were vibrating. Alternatively, you could also replace the cover of the vent with an aluminum model that’s better suited to high-velocity airflow. There are several different designs that might suit your needs. Some have more spaced out louvers while others integrate a cubic grille design, allowing a greater volume of air to pass through.
If you end up installing a new grille, remember to put it flush against the wall. To prevent it from vibrating against the duct frame, put some weatherstripping or foam insulation tape along the edge of the cover. Even if you don’t plan on replacing the cover, that will be a good final step to do before you put everything back together.
2. Clean Out the Inside of the Duct
Oftentimes, people start diving into technical explanations for noisy return air ductwork when the answer is staring them in the face. When dealing with loud fans of any kind, the first thing you should do is get rid of the grime.
A close examination of the grille will probably tell you all you need to know here. Depending on the spacing of the louvers, you can use a pipe cleaner, an old toothbrush, or even just a wet rag to clean the slats. If the situation is extreme and the dust is covering a substantial part of the grille, it might cause pressure issues inside the ductwork.
Once you unscrew and remove the grille cover, you’ll be able to see exactly how much of that dust made it inside the system. If you’ve never cleaned the ducts before, you’ll probably see some dust bunnies inside. Use a vacuum to perform a preliminary sweep then finish the job with a wet rag. Needless to say, the fan should be off during this process.
Notably, cleaning this way will only be possible if you see bare metal walls behind that grille. There’s also a chance that you already have a duct liner there — in which case you could stick to vacuuming. Alternatively, you can use this opportunity to replace the liner, if the glue holding it on has loosened.
3. Clean or Replace the Filter
Once inside the ductwork, you’ll see that one of the walls is covered by a filter. After unscrewing or simply sliding that part out, you’ll want to either clean or replace it.
If you have a reusable filter, you’ll probably just blast it with water from the inner side of the filter. After all, the side that’s facing the grille cover will be the one with all the dust on it. Remember that we’re dealing with return air here. Luckily, that should wash right out.
Alternatively, you might have to order a new filter according to your old one’s measurements. Replacing these parts is quick and easy so you won’t require professional assistance. However, you’ll have to do it every three months or so, depending on how much you use the ventilation system. But if nothing else, filters are pretty cheap, so you won’t have to worry about the cost accumulating.
4. Install (Or Replace) A Duct Liner
Before you move on from the vent chamber right behind the grille cover, there’s one last thing you could do to affect the noise level from there. Namely, you could make sure the sound of moving air isn’t bouncing off of all those hard metal surfaces. After all, if there’s no liner covering the walls of the duct, all those sounds will be amplified.
Typically, fiberglass duct liners are sold in huge rolls that can cost hundreds of dollars. If you’re only looking to line a vent or two, buying a roll may not be a practical decision. Instead, you could opt for a smaller piece of duct insulation or even use leftover automotive or home insulation. As long as the material is soft and between 0.5 and 1-inch thick, you should be able to use it.
Once you have all the materials you need, you’ll want to:
- Measure and cut the pieces of insulation according to the dimensions of your duct walls
- Thoroughly clean and dry the walls so the liner can stick to them
- Apply spray adhesive on the back of the liner and the metal wall
- Connect the piece of insulation to the duct wall — once you’re sure they’re lined up properly
- Pin the liner into the metal sheet it’s glued onto, preventing the return air from sucking it up toward the filter if the glue ever weakens
In this video, a half-inch thick liner managed to knock about three decibels off the noise measurements. Sometimes, that’s all you need to take the sting out of the return air sound. Alternatively, you could opt for thicker insulation to get better results.
5. Troubleshoot Ductwork Issues
Changing the angle of the louvers and cleaning the filter should have drastically reduced the amount of noise you’re hearing from your return air duct. But if the volume of sound hasn’t changed, you might be dealing with faulty ductwork installations. So at this point, you need to check if the system can handle the airflow it’s dealing with.
If you have flexible ducts, you’ll want to make sure that they’re not sagging or bending, as that can reduce the efficacy of the system. Additionally, you should check if the size of the ductwork matches the return air port on your HVAC system.
Even professionals sometimes use incompatible ducts that are simply too small for the port. As we have established, that can increase the static pressure inside the ductwork.
6. Check the Static Pressure in the Duct System
You already know that the airflow inside the ductwork needs to be stronger than its resistance. Otherwise, the system will struggle to function, producing all sorts of noise. But what pressure level is optimal — and how do you even measure that kind of thing?
Well, ideally, the static pressure inside your ventilation system should be .82 or lower. If your manometer shows a higher number, there may be other obstacles in the ductwork. To lower the pressure, you can adjust the fan speed of your HVAC system — though making it work harder certainly wouldn’t make it quieter. Alternatively, you can just start replacing your ducts with larger ones to promote high-velocity airflow.
7. Replace the Sheet Metal Duct With a Flex Duct
As we have previously stated, solid metal ducts will inevitably amplify any noise that comes from your ventilation system. One way to solve that issue would be to replace the metal ducts with a softer alternative. Flexible hose ducts typically consist of two aluminum tubes separated by a fiberglass core that prevents pressure loss and noise leaks.
No products found.
Transitioning to a flexible duct system will reduce return air noise by as much as 10 decibels. If you’re not familiar with that system of measuring sound, that means that the noise will be about half as loud as it was. After all, each additional ten decibels represent a doubling of the noise level.
At this point, we ought to note that flexible ductwork may also reduce the output of your HVAC system. Unlike solid structures, this kind of hose is full of bends and kinks which may reduce airflow.
Still, if you make sure to straighten those kinks out and install the flexible duct properly, you should have no problems with it. Just make sure you get the size of the duct right. Don’t get one that’s too narrow for the return air port on your HVAC unit or furnace.
8. Get a Variable-Speed Blower
If all else fails, there’s one more thing you could do to make your return air duct quieter. Namely, you could replace the fans that are circulating the air in your system with a variable-speed blower.
This kind of device will automatically change the airflow speed based on your heating and cooling demands. Since it’s designed to keep the air moving throughout your home at all times, it usually runs pretty slowly. That’s exactly what makes variable-speed blowers quieter than traditional fans.
Make Sure the Return Air Noise Isn’t a Symptom of a Systematic Issue
If it comes down to getting a new blower, it means that the noise you’ve been hearing probably wasn’t caused by your return air ductworks. Rather, it was the result of a failing HVAC system — or similar systemic issue.
But if that turns out to be the case, implementing all the changes we’ve discussed may feel like a waste of effort. With that in mind, you might want to get a professional to check if your HVAC system is on the brink before going ahead with these changes.
RELATED POSTS: