If you ask me, air conditioning is one of the great conveniences of the modern world. However, AC systems come with certain drawbacks — such as their tendency to start making disturbing noises as the years go by. Your AC should be perfectly functional for at least a decade before it becomes noisy. Still, you should know how to quiet a noisy air conditioner just in case it happens prematurely.
That’s exactly what we’re going to discuss today. Some problems are easy enough to troubleshoot, even for an amateur repair technician. Whether the issue is in the AC blower or in the outdoor unit, I’ll show you several methods you might use to prevent or muffle the noise.

On the other hand, the problem may be too big for you to fix alone. If that turns out to be the case with your unit, I’ll also explain the other two solutions: calling a repair service or getting a new AC. With that in mind, let’s talk about why your air conditioning devices can start screeching at any moment.
Why Do Air Conditioning Units Make Noise?
Now, some people think that noise is a price worth paying for the luxury of having a temperature-controlled home. Those people have clearly never heard the ungodly sounds that can come out of an AC.
As always, if we want to know how to quiet an appliance, we have to figure out what’s making all that racket. With these kinds of machines, the answer is usually less complicated than you’d think. According to this video, there are three parts you should worry about:
The Outdoor Unit
Inside the outdoor unit, you’ll find a compressor, which is basically the heart of the AC system. It has two spiral plates that rotate against each other, pumping the refrigerant through the unit. The plates, or scrolls, can wear down over time, causing a disbalance that may result in incredibly loud clanging or grinding noises. If that is your unit’s issue, it’ll be impossible to repair, since the compressor is hermetically sealed and therefore impenetrable.
Next, you’ll have to check the fan motor, which includes the rotating blades of the unit. Like any kind of electric fan, this part can create fairly loud whirring or whistling noises. The motor may also have ball bearings, which are another part of the device that’s completely closed off. Even though lubrication would help smooth things over, you won’t be able to get it into the part.
Lastly, the culprit may be the contactor, the power switch inside your AC unit. It consists of two plates that come together to allow the voltage to enter the device. Over the years, that motion can cause indentations on the plates, preventing them from connecting and resulting in buzzing sounds.
Dirt and Debris
Of course, there are other things you should consider before you point fingers at any of the outdoor unit parts. For example, some AC units can make whirring noises simply because the blades have to work around dust and debris. You might find the same kind of filth clogging your filters, which can make it difficult for air to pass through silently.
If you are dealing with dirty filters, though, your problems may go beyond the noise. The air you’re breathing may contain all sorts of contaminants. Aside from exacerbating allergies, that can seriously affect your health in many different ways.
Placement
The placement of your AC unit is another potential cause of the noise. If you have a roof unit, the problem may be in the fact that the AC is connected to the internal structure of your house. From the roof joists, the vibrations will move through the wall studs, reverberating throughout your home.
Basically, these kinds of installations can create impact noise — which is one of the most difficult kinds of sounds to deal with. Sadly, though, if this is the problem you’re facing, I’m afraid it won’t be easy to fix.
Even if you don’t have a roof unit, the position of your AC can still cause a lot of noise. For example, let’s say that your outdoor unit has been hung unevenly or positioned on an incline. That can disrupt the balance of the internal components and cause the fan blades to wobble, hitting the surrounding parts of the unit.

Quieting a Noisy Air Conditioner: 7 Actionable Steps
Finally, let’s talk about how you can ensure that your AC is fully functional and quiet. Feel free to treat the following guide as troubleshooting instructions. As you’ll see, I’ve put the steps that are easiest to do first, and harder ones toward the end of the list. Hopefully, one of them will help you solve the underlying cause of the noise.
1. Make Sure Your Outdoor Unit Is Flat
As I have mentioned, the position of your outdoor unit is the simplest thing you can change in this case. But how can you know if the position of the machine is what’s causing the racket? Well, you’ll probably know that’s it if it starts making noise soon after you set it up.
Aside from the fact that the fan blades can start hitting the surrounding parts inside the machine, having your outdoor unit sit at an incline can also impair the lubrication inside the compressor. If the oil can’t saturate the chamber, the scrolls I mentioned earlier will deteriorate faster than necessary.
The solution here is simple: do what it takes to level the machine. There are several ways you might do that, including:
- Moving the whole box — if you have it on grass, move it to a paved or asphalted area
- Putting wood shims under one side to even out the unit (if moving it is out of the question)
Another thing you may want to do, no matter where the machine is positioned, is to slide an anti-vibration mat under it. Whatever you do, though, take care not to disturb the cables that run from the walls to the outdoor unit. That may cause even bigger issues down the road.
2. Clean Out the Blades and Filters
The next logical step you’ll want to take is a matter of basic maintenance. Air conditioning systems often make noise because people let dust accumulate on the filters. The dust and pollen that get stuck to the AC filter can suffocate the compressor. If the compressor stops working, it can clog the evaporator coils and cause them to freeze over.
To prevent that, swap out the filters as soon as they turn slightly gray. The new filters don’t even have to be expensive. Some only cost a few dollars, and they’re just as effective as the pricier options. And the best thing is that you won’t have to feel guilty when you replace them as soon as they look dirty.
In addition to cleaning out the filters, you should also keep an eye on the outdoor unit. Use a garden hose to gently wash away the dirt from the exterior of the box. Just don’t use a pressure washer — that could put dents in the unit and make it even louder.
While you’re at it, try to get any pieces of leaves or debris out of the fan blades. You just have to be careful when you take the grille off. Make sure the machine isn’t working when you reach between the blades. To stay on the safe side, you could use long pliers to take out anything you find and clean the blades with a duster that has an extension pole.

- 3 ATTACHMENTS FOR ALL YOUR CLEANING NEEDS...
- BENDABLE DUSTER HEADS – This blue...
- EASY TO CLEAN- All Duster Heads are easy to...
- DUSTER w/ EXTENSION POLE – High quality...
3. Tighten or Replace Grille Screws on the Outdoor Unit
Whether the outdoor part of your AC system is suspended on the wall or placed on the ground, you’ll easily find the grates that protect the fan blades. They’re our next point of attack. Over time, the grille can start to rattle, which can be pretty annoying if you let it go on for long enough.
To nip that in the bud, you need to tighten the screws. However, if that doesn’t work, simply replace the original screws with slightly wider ones. The vibrating of the blades can cause the screws that keep this grille bolted to the unit to widen the screw holes. If that happens, wider screws will fill out the holes a bit better and prevent the grille from moving. Rubber gaskets may help close the gap between the unit and the grille.
4. Prevent the Vibrations From the Inside
If the noise persists after tightening or changing the screws, it’s time to take a look inside the outdoor unit. Locate the screws that hold the top of the unit down and take them out. Research the AC system you have for more information on how to open it. You should also find out which of the internal components are safe to touch.
Inside the unit, you’ll see exposed evaporator coils or pipes. If the noise you’re hearing is a loud buzzing sound, it’s caused by these coils colliding. However, that’s not an insurmountable hurdle: you’ll just need to separate the parts that are vibrating.
But first, you’ll need to figure out which coil is causing the racket. Touch each of the coils in turn until the noise stops. You’ll have to do this while the machine is running, but the coils aren’t dangerous. If you want to be safe, just in case, you can perform this check with gloves or various instruments.
When you find the ones that were making the noise, insert bits of wood or rubber in between the vibrating parts. Other materials, like open-cell foam tape or something else you find lying around, might work just as well. You can see what this kind of solution can look like in this video:
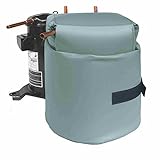
5. Install a Sound Blanket
Since a compressor is hermetically sealed, you won’t be able to look inside. However, if you are sure the sound is coming from the compressor, you can use an AC sound blanket. These products are essentially fitted soundproof blankets that are specifically tailored to go around barrel-shaped compressors.
According to the manufacturer, this sound wrap can reduce compressor noise by at least 40%. Because of its box-like shape pattern, it’s also pretty easy to set up. Just put the center of the blanket over the compressor, then wrap the sides around the device. The product I’ve linked to can fit compressors that are up 19 inches tall and 10 inches wide, though you’ll easily find blankets for bigger units as well.
- Fits Maximum Size Compressor: 10" x 10" x...
- It will make your neighbors happy
- Convenient easy to install universal-fit...
- Minimum 40%+ reduction of compressor noise
6. Make a Soundproof Box
Now, if your AC unit doesn’t have the standard kind of compressor you can cover with a sound blanket, I recommend constructing a soundproof box or fence. However, an outdoor unit needs to be able to breathe, so to speak, so you probably shouldn’t completely encase it in solid wood and MLV. However, there are other choices you might use.
One thing I’ve seen many people use is bamboo wood. I already have a roll of it that I use to make outdoor privacy screens — so you may have it lying around as well. Because of the tiny slivers of space between the bamboo stalks, the air from the AC fan could keep circulating without overheating. You could also use various greenery to conceal the outdoor unit and dampen the noise it makes.
Additionally, you can still use MLV or regular rubber to line the parts of the machine that don’t have vents. It would certainly improve the soundproofing properties of this method.
7. Call in an Expert
Finally, if nothing else works, your last course of action will be to call in the experts. A repair technician can perform all sorts of tests you’re not qualified to run.
For example, they could measure the refrigerant pressure inside the unit. If it isn’t what it should be, they might conclude that the bypass inside the compressor is stuck open, which can be the cause of horrifying squealing noises. You wouldn’t be able to act on these results because the only solution would require you to change the compressor.
Naturally, a technician would be able to find and install any new components your AC system needs. I’ve already mentioned that the ball bearings inside the fan motor can create unpleasant whirring sounds if they don’t have enough lubrication. However, since that part of the motor is impenetrable, your technician would have to get a new motor. On top of that, they’d need to precisely set the speed settings according to the AC unit model specifications, which is definitely not a job you’d be able to do by yourself.
Ultimately, scheduling regular maintenance visits is great for preventing and fixing any issue you may have with your AC system. A repair service would clear the unit drains, change the filters, and remove the debris a few times a year. As a result, your AC unit would be quieter, more energy-efficient, and the air it circulates would be notably cleaner.
If All Else Fails: Get a New, Quiet AC
Hopefully, the answer to your noisy AC problem lies in the article above. However, if all other attempts fall short, there is one last thing you can do: get a new air conditioning system.
With a variety of AC types available, each comes with its own set of benefits and drawbacks. To explore some options, have a look at our articles discussing the best quiet wall ACs and top quiet portable units.
Nevertheless, I wouldn’t suggest buying a new AC without exhausting your other options first. After all, new AC units can be pretty expensive. Still, if a technician you trust tells you that repairs won’t do much good, you should probably start looking for a replacement.
OTHER RELATED POSTS: