In my ongoing battle against noise, I’ve tried out many different kinds of acoustic treatments. From furniture to foam panels, there’s a wide range of materials you can use to make it more difficult for sound waves to bounce around your room. However, while I was busy espousing the benefits of soft materials for sound absorption, I neglected to investigate another important soundproofing concept: sound diffusion. So today, we’re going to talk about sound diffusers, where you can buy them, and how you can make them.
In addition to product recommendations and DIY guidelines, I’ve also included some tips for the placement of these treatments. Before I can go into the details, we should establish a working definition of sound diffusion. But first, we have to understand how sound waves behave.

How Do Sound Waves Travel?
If you’re an acoustics aficionado, you know that sound waves travel outwards from their source in all directions. Still, artificial sources such as speakers are able to direct the waves. Conversely, some objects can act as obstacles and avert or reflect them.
In open space environments, sound waves keep spreading until they naturally dissipate. The length of the wave — or, rather, the distance it can travel — mainly depends on its frequency and volume. The higher the volume, the greater the distance, that much is obvious. However, for frequencies, it’s the opposite.
Generally, low frequencies are capable of traveling greater distances than higher ones. Some of them are so powerful and persistent that they can shake thick walls. In fact, low bass frequencies can hitch a ride on nearby objects as impact noise, which is why you might feel the traffic in front of your building. That kind of noise can only be averted by decoupling the inner construction of the building from the interior drywall.
Acoustic Treatments and Sound Diffusion
Now, the sound waves in our homes are generally trapped by four walls, a ceiling, and a floor. If the room is scarcely furnished, the sound waves can bounce off the hard, flat surfaces for a long time. The solution to that particular problem can involve the implementation of three different acoustic treatments:
- Absorption, which is typically provided by various light, soft, and porous objects such as sofas, blankets, or curtains. Alternately, you might use professional acoustic absorbers like foam or fabric panels. Even paintings can do the job since they effectively prevent the sound waves from making direct contact with the wall.
- Bass trapping also involves soft, porous materials, though their placement changes their function. As I have already mentioned, low frequencies are larger and more powerful than high frequencies. Because of that, they tend to spread throughout the room and collect in the corners. To prevent bass noise from causing audible distortion and shaking the building, you can put bass traps along the vertical and upper horizontal corners of the room.
- Sound diffusion works in conjunction with the previous two acoustic treatments by breaking up sound waves to evenly disperse them. Unlike the previous two principles, diffusion relies on harder, non-porous materials like wood. In any case, it’s not the material of the product that matters as much as its shape. This method results in a more even and decentralized audio experience, which can also make your room seem larger.
All this to say, each of these principles plays a significant part in improving the audio quality in any given room. Of course, they’re mostly used in recording studios and other areas where good acoustics are particularly important. So let’s see how the principle of diffusion really works by looking at different types of sound diffusers.
How Do Sound Diffusers Work?
As different as sound waves and light waves are, they both have a similar response to diffusion. Imagine pointing a light beam at a disco ball. While the light source may be powerful, the differently angled pieces of glass would reflect the beam into many different directions. The scattered beams of light would be much softer than the original light beam thanks to the principle of diffusion.
Of course, sound diffusers aren’t spherical like a disco ball. Instead, they’re usually square or rectangular wall installations, like fabric panels. However, as I’ve mentioned, they’re usually made of wood. So how does wood emulate the pieces of glass?
Well, sound diffusers use the depth and angles of the planes of the panel to scatter various sound frequencies in all directions. The height, depth, and angles of the grooves (also known as wells or troughs) or shapes on the sound diffuser also impact the frequencies they’re capable of diffusing.
Since low frequencies are more powerful, they usually enter the deeper wells and diffuse from there. Meanwhile, high frequencies often bounce off of the top layers of the diffuser. Home theater diffusers tend to be fairly shallow, ranging between 1and 5 inches deep. However, if you were to make a DIY sound diffuser, the depth of the wells would depend on the frequencies you’d want to scatter.
Additionally, if you wanted the sound diffuser to disperse the sound waves evenly — which is the goal here — the wells would need to be symmetrical. The patterns are the reason most sound diffusers look like art installations even though they have a practical purpose.
Best Commercial Sound Diffusers
Before you see some of the best commercial sound diffusers I’ve come across, let’s answer one basic question. Should you even bother buying a diffuser, considering that these treatments should answer to the specific conditions of your room? As I’ve just explained, the appearance of the diffuser should ideally correspond with the frequencies that are causing trouble. In many ways, making your own diffuser — or at least ordering a custom one — is better than getting a commercial product.
There are some benefits to getting a ready-made diffuser as well. Namely, purchasing one certainly requires less effort than building it. While making one yourself would lower the overall cost and allow you to completely customize the result, you’ll also find that commercial diffusers come in an array of designs. So finding one that would fit in with the rest of your decor shouldn’t be a problem.
In any case, many people prefer taking the no-fuss route and simply ordering the diffusers. However, before you make your purchase, you should know what kind of products you’ll be dealing with.
Baffles
In the world of acoustics, baffles are constructions that are meant to block noise from traveling freely. The word itself has many meanings, including:
- An exhaust muffler or silencer — a device that blocks the sound of your vehicle’s exhaust pipe
- Fabric panels that hang from the ceiling to reduce the echo in a large room
- Noise barriers on the side of highways
In this particular case, though, baffles are simply the most basic kind of diffusers you can get. Despite their simple design and low price, they should be great at preventing noise build-up in regular environments. However, I wouldn’t recommend using them for professional audio setups. After all — you get what you pay for.
The low price point also affects the products’ design and build quality. Rather than being made of wood, they’re made of PVC. The thermoplastic is usually molded in a way that leaves the back hollow, so it’s also fairly lightweight. You should have no trouble mounting these panels with pushpins, Velcro, or even tape.
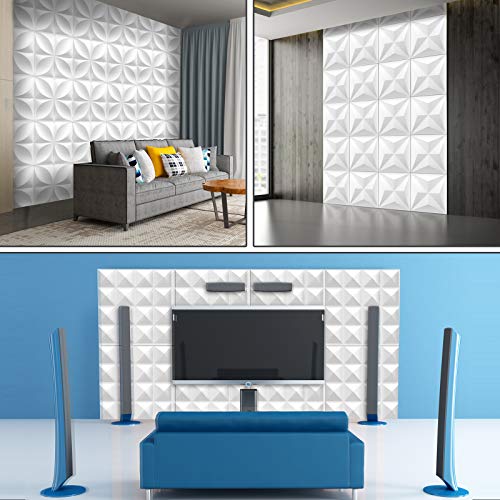
There are two products I could stand behind in this general category. First, there are the TroyStudio Acoustic Sound Diffuser Panels. The panels come in packs of four 12-inch squares, so they’re exactly the size of the average foam panel. They come in white and black options and their pyramid pattern does a good job of diffusing high frequencies.
However, at only one inch deep, the product isn’t that great at handling the mid-to-low end of the spectrum. For that, you might need the Auralex Acoustics 3D baffles. The 24-inch square panels come in packs of four. They also have a much more complicated pattern, which is 5.5 inches deep at most, giving these baffles a slightly greater frequency range.
Decorative Diffusers
When I was looking for sound diffusers online, I noticed that UA-Acoustics was doing a pretty great job flooding the market with decorative options. Still, I wasn’t sure how effective some of those diffusers would be. According to the product specifications, most of them should be able to scatter frequencies between 350 Hz and 5,000 Hz. If that range matches the frequencies you’ve picked up at your home, the products I’m about to talk about should work pretty well.
Before I mention some specific items, though, I should say that the company markets these products as sound absorption and diffusion acoustic panels. Generally, they have a laminated front with some kind of design cut out of it, which allows sound waves to pass through to the foam center. The 19.7-inch square panels are just over 2 inches thick, each weighing between 2 and 3 pounds. So you’ll need something stronger than pins and tape to mount them.
Since these products qualify as absorption panels as well as diffusion devices, they also have an NRC rating. I’ve already mentioned the noise reduction coefficient rating in some of my earlier articles about acoustic foam or fabric products, like the ones Mybecca makes. These products get a score based on how effective they are at absorbing errant frequencies on a scale of 0 to 1. These decorative diffusers have an NRC rating between 0.62 and 0.71, which means that they can remove 62–71% of medium frequencies.
Pattern Design and Color Panels
While most UA-Acoustics panels are uniform in size and even the colors they come in, they all have unique designs cut out of the front. One of their most popular models is the Wave panel, which has an audio wave design. Those panels come in 11 different colors, in packs of four or two pieces.
The Pulsar design also resembles the audio wave design, except the cutout itself is somewhat different. Apparently, that difference is notable enough to earn this product a slightly higher NRC rating.
Next, we have the Skyross design, which completely foregoes the audio theme we’ve seen so far. Instead, this panel has most of its inner foam exposed. The laminate front is mostly cut out, leaving lines criss-crossing over the foam. According to the company, this product can diffuse a range of frequencies from 200 Hz to 5 kHz. Furthermore, it has an NRC rating of 0.64, which is slightly lower than the previous two.
If you’re looking for a diffusion panel for your office, the Grid pattern is probably the most professional-looking of the bunch. The panels feature a grid of 5 by 5 squares that are all equally spaced out from one another. In the space between the squares, the sound waves can pass through to the foam inside the panel. The Grid panels only come in five of the basic wood shades, black, and white.
Other UA-Acoustics panels come in a range of wood imitations like oak, nut, or wenge, Sonoma, or cherry wood. In addition, you can also get simple colors like white, black, or red, in either a matte or glossy finish.
Quadratic-Residue Diffusers
You may have noticed that my reviews of decorative panels and baffles don’t match my description of regular diffusers. That’s because it actually describes quadratic-residue diffusers or QRDs. Using geometric shapes, these products respond to the needs of the specific space you’re treating.
The primary purpose of these kinds of diffusers is to evenly scatter sound energy around the room. They do it by using symmetrical positioning of the wells that scatter different frequencies. However, they are at their most effective when you leave some space between you and the diffuser — about 6 feet should do. That just allows the diffused wave to completely form.
The ATS Acoustic Diffuser is an excellent example of a QRD. The 23-inch square panel has 7 wells of varying depths, although the entire thing is about 6.5 inches thick overall. At those depths, the manufacturer estimates that the diffusion works on frequencies from 325 Hz to 3 kHz.

- 7 well quadratic residue diffuser (QRD...
- Precision manufactured in the USA using...
- Begins scattering at 325 Hz and offers...
- Built to last with high quality multi-ply...
Unlike the decorative diffusers, though, this product has no absorptive properties. After all, it’s made of birch wood, rather than laminate and foam. The higher build quality is also responsible for the overall weight of this product being 20 pounds per panel.
On a related note, QRDs also come in a two-dimensional pattern, which looks more like a chessboard. These kinds of products are supposed to create a better depth of sound in any room. However, they’re especially great in small spaces since they scatter sound waves evenly in a spherical pattern.
This BXI Sound Diffuser is the perfect example of this principle. Between the deeper set squares and the more shallow fields, it’s capable of diffusing frequencies from 544 Hz to 24,571 Hz. So it would be significantly better at diffusing high frequencies than the other products I’ve mentioned.

How to Make Your Own Sound Diffusers: 3 DIY Options
Now that you know what commercial diffusers look like, you can probably think of a few ways to make each of them. However, if you’re not feeling particularly inspired, I’m here to present three methods you can use to make your own sound diffusers.
As I have mentioned, before you can start sawing materials, you have to determine the range of frequencies that are building up in the room. Once you know the range of frequencies you need to diffuse, it’ll be easy to calculate the shape of your diffuser.
You can use a computer program like QRDude or AcousticCalculator, or even an app like Diffuser Calculator. Prepare to convert the metric results into imperial measurements before you start building. Alternately, you can stick to online calculators if you can find one for the specific kind of diffuser you’re looking to build.
There are all sorts of guides available online, but you shouldn’t follow them verbatim. You have to make adjustments: remember, your diffuser should be a response to the specific environment you have. Once you know the frequencies you want to diffuse, you’ll just need to enter the data into a calculator and follow the instructions you get.
Quadratic-Residue Diffuser
If you want to build a QRD with basic vertical wells, start by finding software that can give you the information you need. You can also borrow someone else’s schematics, as long as they match the frequencies you’re trying to diffuse.
Now, it’s time to get your supplies. As we know, diffusers are made of wood. However, the specific kind of wood you choose will have an impact on the acoustic properties of the diffuser. Generally, you should stick to cherry, alder, or pine wood — even basswood would do. You’ll need to get different kinds of boards and posts for the various parts of the diffuser, including:
- A cabinet, or a frame, with a back board and four sides. When you attach the sides to the back in a horizontal position, it should look a bit like an empty drawer. For this, you should get sturdy boards that are about half an inch thick.
- Vertical wells are sectioning boards that fit snugly inside the frame. They should be thinner than the frame boards, so about a quarter of an inch thick. As far as I can tell, these slots exist to make it easier to vary the depth of the wells without wasting a lot of wood by stacking it up.
- Lastly, you’ll need square poles that should fit neatly in between the vertical wells.
In the video below, you’ll see how you would put together a DIY QRD kit from Acoustic Fields. I recommend watching the tutorial even if you’re making your diffuser from scratch. However, if that’s your plan, you may also be able to get away with just getting a back board and stacking the different well levels on top of it, securing each one with wood glue.
Two-Dimensional QRD
Building two-dimensional QRDs is similar to the process we have just seen. You can start by making a drawer or just stick your towers directly onto the back board. But first, you’ll need to figure out how many towers you’ll need at each height — that’s where a diffuser calculator will come in.
When it comes to the building process, making a 2D QRD is even easier than making a regular QRD. The calculator will tell you everything you need to know, then you’ll just have to follow simple instructions. If your hardware shop offers cutting services, you can even avoid sawing the towers and get right to gluing.
You can see a great 2D QRD building tutorial in this video, which also illustrates how you can use the Diffuser Calculator app I mentioned earlier.
Skyline Diffuser
Skyline diffusers are similar to two-dimensional QRDs at first glance. However, while the columns in 2D QRDs are symmetrical, skyline diffusers appear to be random — resembling a cityscape. Actually, you might say that skyline diffusers require a more complicated calculation, which is why it’s easier to find a diffuser calculator for the other kinds of devices.
Still, making a skyline diffuser shouldn’t be that much different than making a 2D QRD. You just have to find a source that can teach you how to calculate the different tower depths you’ll need. In fact, making a skyline diffuser might even be easier since most people don’t make them with a full frame.
Instead, you’ll need a reasonably thick board and square poles you can cut down to the height you need. Before you start gluing each of the towers, you could also draw a grid on the back board and fill in the sections with the numbers from the diffuser calculator. That will allow you to focus on assembling the diffuser without glancing at the guide.
Speaking of which, if you ever suspect that your diffuser would be too wobbly with the only glue being between the towers and the backboard, you can also add glue between each tower, fusing it with the ones around it. Additionally, you could also drill a long screw into each of the towers from the back board.
Moreover, whichever one of these diffusers you end up making, you can finish the project by staining the wood or leaving it as it is. To see how a skyline diffuser is assembled, check out the following video.
How to Mount Your Sound Diffusers
Now that you have your diffuser, you’ll just need to hang it up. But before you get your hooks, you’ll need to know where it would do the most good.
Where Should You Put the Diffusers?
When it comes to the placement of your sound diffusers, you should consider the shape of the room and the position of the source of the noise. So let’s start with your audio needs.
If you’re a sound engineer, you need to have the best possible listening experience so you can discover possible discrepancies in the sound. So let’s say you have a standard setup of a computer desk with two speakers on the left and the right, pointed toward the chair in the middle.
Obviously, your listening experience would be adversely affected if you didn’t have adequate acoustic treatments on the walls and maybe even the ceiling. Without any acoustic products there, you’d probably hear all sorts of sound distortions and echoes as the sound waves bounced off the walls.
The audio from the left speaker would hit the wall on the right side of the chair, while the sound from the right would hit the wall to the left. Both waves would also hit the surface directly behind you. In this situation, you’ll want to have absorbers on the sides, and diffusers in the back of the room.
Of course, the actual room you want to fix up could require something completely different. To determine your needs, you’ll have to start with the purpose of the room. The ideal approach will depend on whether you’re working on improving the acoustic quality of a studio control room, a home theater, or just a computer room. But I’ll talk a bit more about that when I share my final thoughts.
Ultimately, you’ll want to find where the reflection points on your walls are in relation to your speakers. That’s where you’ll want to place all of your acoustic treatment products: whether they’re curtains, fabric panels, or sound diffusers.
How Do You Install Your Diffusers?
Depending on the kind of diffuser you have, the installation process may vary. As you have seen, some of the commercial diffusers are pretty light, so you could just pin them to your wall. However, most of the heavy-duty ones are also quite literally heavy, so you’d want them to be more secure when you mount them.
Depending on the weight of the panels, you might be able to use some of the mounting methods I shared in my article on acoustic panels. Z-clips would work well if you wanted to install the diffusers on the wall. You’d just need to drill the screws into the back of the diffuser and onto the wall, and you’d be set.
Alternately, you can use a heavy-duty picture hanger from Hangman, which is a similar product with superior performance. The following video provides a good tutorial if you’re unfamiliar with this kind of product.
On the other hand, if you’re planning to hang your diffuser up on the ceiling, you might want to stick with L-brackets instead. You’d have to screw one side of the 90-degree metal piece into the side of the diffuser. Then, you can attach the other side directly into your ceiling.
Of course, you can also use L-brackets for wall installations, if you just want a sturdier attachment. However, you should know that they’d be bulkier and more visible than clips and back hangers.
Final Thoughts on Sound Diffusers
As promised, I do have a few final tips to dispense before I send you on your merry way. You can use these suggestions when you’re trying to decide where you should put your acoustic treatments. As I have explained, the purpose of the room has a lot to do with the positioning of the diffusers.
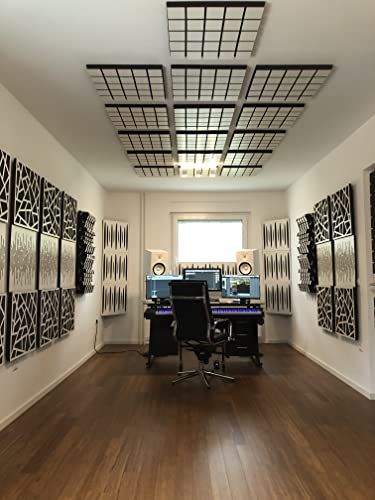
For example, if you want to fix up your home theater, you’ll likely be dealing with multiple sources of audio. Usually, you’d have two speakers in the front of the room, two on the sides, and two in the back. All of those channels would need both diffusion and absorption. However, your diffusers would be especially useful on the wall in the back of the room and the ceiling.
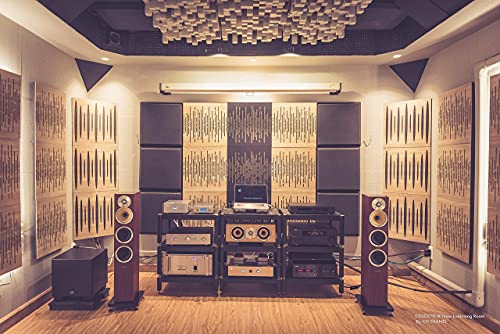
If you’re setting up a control room in a recording studio, focus your attention on the rear wall. The best solution would be to set up vertically positioned QRD diffusers. However, you can also use some of the other diffuser types we discussed.
Control rooms differ from regular computer rooms like the one I described earlier, however. In those kinds of listening rooms, you’ll want to get diffusion in the back and front walls of the room. Additionally, you should have absorbers on the sides, to pick up runaway speaker sound waves. Of course, acoustic absorbers would be a welcome addition in all of these scenarios.
Ultimately, diffusers and absorbers work in tandem to create the perfect acoustical conditions for you to do your work or just enjoy your entertainment.
RELATED POSTS: