If the noise coming from your dishwasher has become unbearable, the cheapest solution to your problem would be to wrap the whole thing in insulation blankets. But how do you find the right product for your machine? And how do you go about installing it when you get it?
This guide will answer all your questions about dishwasher insulation, including — why you should use it at all.
The Benefits of Using Dishwasher Insulation
To begin with, let’s talk about how dishwasher insulation can improve your user experience.
Muffling the Sound of Running Water
During the washing cycle, your dishwasher naturally produces an assortment of noises. Most of them are the usual sounds of water spraying over your dishes or gurgling as it drains from the machine. Still, even those are bound to become annoying if you hear them often enough.
Luckily, insulation can take most of the noise away. Even just padding the sides and back of the dishwasher will significantly reduce the sound of running water and general humming and buzzing most machines produce. However, if you want to make sure no noise escapes, you’ll probably have to close off the appliance from the front as well. But don’t worry — we’ll get to that.
Preventing Vibrations From Transferring to the Kitchen Cabinets
The most annoying sound you’ll hear coming from your dishwasher is the infernal banging and tapping noise it makes as it vibrates against the surrounding cabinets. Preventing the machine from doing that is perhaps the most significant benefit of using insulation.
Some dishwashers have even been known to vibrate so powerfully, they march right across the kitchen floor. That may be why we started keeping them between cabinets and screwing them into the counter in the first place. However, those things won’t stop them from shaking your whole kitchen setup — but insulation will.
Protecting the Surrounding Elements From Condensation and Heat
Outside of acoustic concerns, dishwasher insulation has a crucial role in protecting your kitchen elements from the damaging effects of water and heat. After all, as your dishwasher runs its cycles, condensation collects on its external walls. Between that and the occasional leak, water is bound to get on the presumably wooden kitchen cabinets the appliance is built into.
As if that weren’t enough to get a colony of mold and mildew started, dishwashers also get pretty hot. As the machine uses hot water to clean the dishes, the heat is transferred to its metal shell. That, in turn, raises the temperature of the kitchen cabinets, making them the perfect breeding ground for bacteria and fungi. So if the water doesn’t start the rotting process, the heat surely will.

Choosing the Right Insulation for Your Machine
Now that you know what dishwasher insulation should do, you might be wondering how to find one that fits your needs. Your ideal insulation should be:
- As wide as your dishwasher is deep (or wider, you can always cut it later)
- As thick as possible while still being able to slide back into place with the dishwasher
- Made of a waterproof material like ceramic fiber
At the very least, you should opt for polyester over cotton insulation, in this case. As a natural material, cotton could react adversely to being damp for long periods. It would eventually deteriorate, spreading rot to the surrounding furniture as well. So since dishwashers are prone to condensation and leaks, you might want to stick to synthetic materials.
To determine the exact dimensions you’ll need, you just have to measure your dishwasher. If you can’t figure out its depth, measure the depth of the counter instead. Unfortunately, if the cabinets are flush with the machine, you won’t be able to figure out the thickness you’ll get to stuff into that space. However, most insulation materials should compress easily to fit wherever you need them to.
How Much Should You Get?
At this point, you’ll need to consider the length of your insulation as well. When you install the product, you’ll want to lay one piece across the sides and top and another in the back. That means that you’ll get your total length by adding the width of the appliance to three of its heights. The sum should give you the minimum length you’ll need to order.
The standard depth and width of a dishwasher are about 24 inches, while the standard height is just under 35. So you’ll probably need at least 94 inches to cover the top and sides. On top of that, you should get another 35 inches for the back panel — more, if you want the pieces to overlap.
Top Dishwasher Insulation Products on the Market
Unfortunately, the current selection of dishwasher insulation blankets you’ll find online is depressingly sparse. The products you’ll come across are either too flimsy, too small, or made of unsuitable materials. A brief perusal of the reviews reveals dozens of users who found out that the insulation they ordered was incompatible with their appliances. Still, several companies can provide what we’re looking for.
1. CM-Ceramics 8-Pound Ceramic Fiber Insulation
If you’re not opposed to putting up individual panels of insulation on each side of your dishwasher, I recommend getting this CM-Ceramics insulation. The ceramic fiber insulation comes in 31 by 24-inch rectangles, which is just shy of our 35-inch goal. Still, you could patch the missing pieces by ordering one panel more than you need. Keep in mind that each product will come with a complimentary utility knife — you may end up owning more than you bargained for.
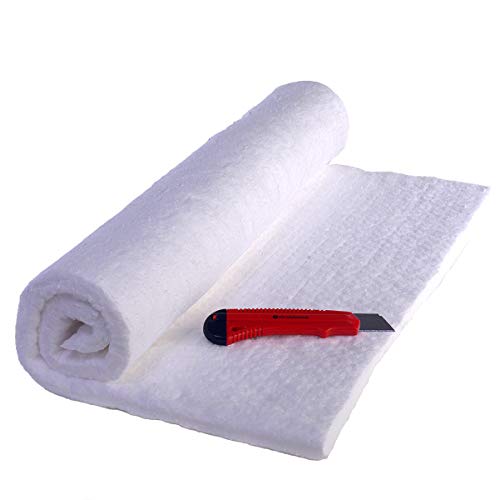
Now, this material should be able to withstand up to 2400 degrees Fahrenheit. Even though your dishwasher won’t come close to that, it’s nice to know that the insulation is so effective. Thanks to its density of 8 pounds per cubic foot, it should also be a pretty impressive noise dampener. However, it can also handle compression, so you’ll have no trouble pushing the dishwasher back into place.
Features:
- 24 by 12 inches or 24 by 31 inches
- An inch thick ceramic insulation
- A density of 8 pounds per cubic foot
- Rated to 2400 degrees Fahrenheit
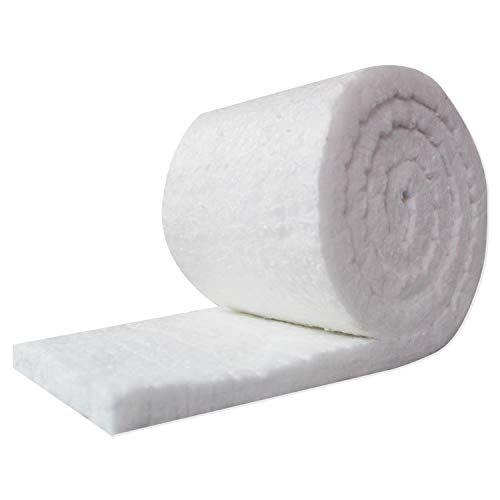
2. CeramaFiber Ceramic Fiber Insulation Blanket
If you don’t want to work with panels of insulation, I suggest getting a roll of the stuff, instead. The two I’ve found have a slightly lower density than the previous product I’ve mentioned, at 6 pounds per cubic foot. This one is also a bit thinner, at three-quarters of an inch. However, its dimensions make up for that deficiency.
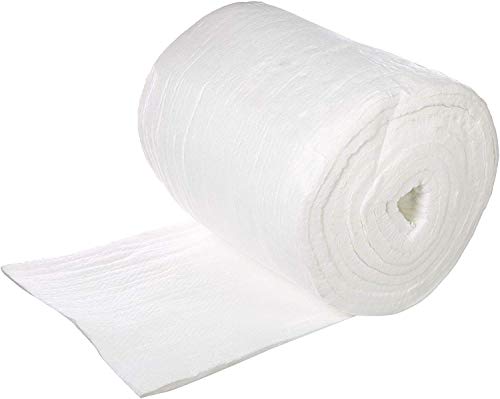
Namely, this CeramaFiber insulation comes in 24-inch wide, 29-foot long rolls. Since one of these can cover 58 square feet, it should be enough for your dishwasher too. If you have any extra, you can use it to insulate other appliances like wood stoves, pizza ovens, etc. Either way, it should be able to withstand up to 2300 degrees Fahrenheit.
Features:
- 24 inches wide, 29 feet long
- 3/4-inch thick ceramic insulation
- A density of 6 pounds per cubic foot
- Rated to 2300 degrees Fahrenheit
3. UniTherm 6-Pound Density Ceramic Fiber Insulation Blanket Roll
Lastly, you could check out this UniTherm ceramic insulation roll. Like the others, it’s 24 inches wide, which would suit your purpose. It also has the same density and heat rating as the previous product I’ve mentioned. As far as I can tell, there are only two differences between them.
For one, this roll is 25 feet long, covering an area of 50 square feet. If you’re not planning any other projects, this might be the better product to use. Additionally, it’s an inch thick, rather than three-quarters of an inch. However, depending on the amount of space you have between the dishwasher and the kitchen cabinets, that may not be an advantage.
Features:
- 24 inches wide, 25 feet long
- An inch thick ceramic insulation
- A density of 6 pounds per cubic foot
- Rated to 2300 degrees Fahrenheit
How to Install Dishwasher Insulation
Now that you’ve seen some of the products that could achieve the effect you’re looking for, let’s talk about how you would install your insulation.
Find How the Dishwasher Is Connected to the Rest of Your Kitchen
The first thing you’ll need to do is figure out how your dishwasher fits into the rest of your kitchen. As established, some people screw them into the counter to prevent them from sliding out. However, you might find that yours is just attached to the water and electric supplies.
If you’re lucky, you won’t have to do anything but gently wiggle the dishwasher out to apply the insulation. Your kitchen structure would have to be pretty loose, so the appliance isn’t attached to the surrounding counters. Additionally, the dishwasher would have to have a long power cord and flexible water supply pipes. In that case, you may not even have to disconnect those two.
Disconnect the Dishwasher From the Water and Power Supplies
If your appliance is built into the counter, you’ll have to go through some extra steps. To begin with, you’ll have to cut off the power and water supply lines. First, go to your circuit breaker panel and locate your dishwasher’s switch.
After turning the power off, find the water pipes that connect to the machine, and twist the nearest valve shut. If you have a regular setup, you’ll find what you’re looking for under the sink.
Once the power and water supplies are cut off, you’ll need to detach anything that’s directly connected to the appliance. Since most of that stuff is usually under the dishwasher, start by unscrewing the access panel below the machine. At that point, you’ll need to disconnect the water supply pipe and electrical wiring from the appliance as shown in this video:
As you can see, you’ll be working in pretty tight quarters so you won’t have much space to move. You’ll also have to lay down a towel or pan to catch the excess water that’s caught in the pipe. Since those circumstances won’t make your tasks easy, you might want to leave this step to the professionals.
After you deal with the wiring, you’ll need to disconnect the water drainage hose as well. You’ll probably find a part you can loosen under the sink. When you do, make sure to push the hose back toward the dishwasher to make the removal easier.
Loosen the Screws and Lower the Legs
Next, you’ll just need to deal with those screws along the top edge of the dishwasher. You’ll only see them when you pull down the door. They’ll either be on the underside of the counter or the side cabinets.
Once you loosen the screws, the appliance will be almost ready to come out. Needless to say, you’ll want to keep all the items you remove from your dishwasher in a safe place while you wrap insulation around it.
The final thing you’ll need to do is retract the front legs of the dishwasher by twisting them with a small wrench or some pliers. Then, crack the door of the machine open enough to grip the top, and wiggle the whole thing out.
Go slowly to avoid tangling the water outlet hose and other elements you’ve disconnected. Additionally, if you don’t want to scratch the floor, you could hoist the front legs of the appliance onto a piece of cardboard, then slide the whole thing out. Typically, these kinds of appliances have wheels instead of back legs, so you should be able to get it out without a problem.
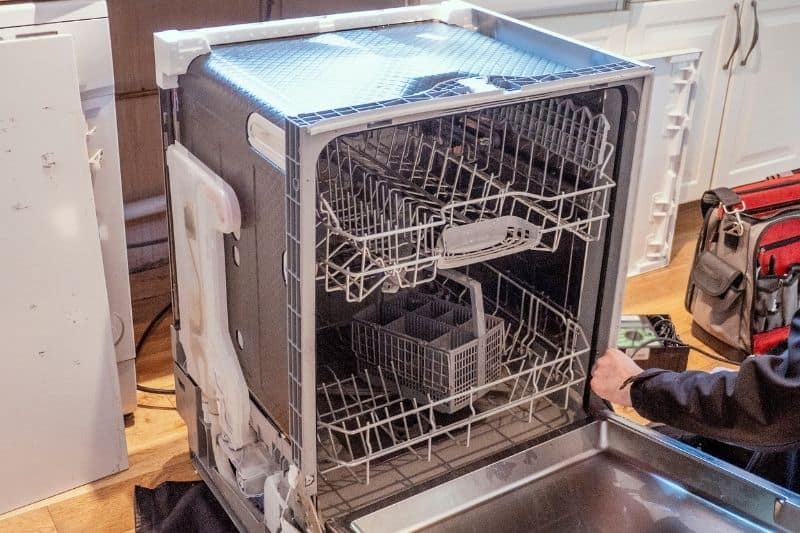
Wrap the Insulation Around the Dishwasher
At this point, you should be able to see your whole dishwasher. You may even notice that it already has some kind of insulation in place. However, the kind that comes with the product is usually pretty thin and ineffective. So feel free to cut that away before installing your new insulation.
For your first piece of material, add your machine’s width to two of its heights to get the piece you’ll drape over the sides and top. Then, cut out another piece for the back that slightly overlaps with the piece on top, and tape everything together.
If you don’t want to use tape, keep the insulation in place with retainer screws as shown in the video. The material shouldn’t block vents and other important features on the sides of the dishwasher. So make sure to cut out sections of the material to make it fit perfectly.
Put Everything Back the Way It Was
When you finish wrapping the insulation around the machine, you’ll have to wiggle it into place. Do your best to compress the material as you shove the dishwasher under the counter again. If your new insulation is thicker than the original one, as it should be, you may have some difficulty with that. Still, if you taped everything down securely, you should be able to push it through.
After you do that, you can work backward to connect everything you previously detached from the dishwasher. Put the front legs down, screw in the top, and connect the water outlet hose, the wiring, and the inlet pipe.
Add Some Final Touches
Before you put the access panel back in place, you might want to do a test run with your machine. A short program will let you know if you need to screw the water pipes tighter or add insulation to certain places. You’ll want to watch for leaks and randomly vibrating parts.
If you happen to see one of the hoses tapping against the floor or other nearby elements, wrap some of your leftover insulation around them, too. You could also put insulation on the back of your access panel before screwing it shut. That should pretty much guarantee you never hear another peep from your dishwasher.
However, if the sound of running water is still too loud, there’s one last thing you could do. Namely, you could attach a piece of a soundproof blanket or curtain over the front of the appliance. First, screw and/or glue the fabric into the side of the countertop in several places (you could even sew or glue on hook and loop strips).
Add a few of the closures on the sides to keep the panel down while the machine is working — and you’re done. You’ll still be able to flip up the fabric to load and unload the dishwasher, but the additional mass should muffling the sounds while it’s working. Just keep in mind that the material will need to be a bit wider than the appliance for this tip to work.
Alternatives to Dishwasher Insulation
If you don’t want to purchase dishwasher insulation, there are different ways to muffle the sounds that may come from your appliance. Namely, you could use moving blankets instead of insulation, apply sound-deadening mats, or simply buy a quieter dishwasher, if you can afford one.
On the other hand, you could soundproof the room and keep the door closed while the machine is running. Since dishwashers are generally in the kitchen, you probably shouldn’t use many absorbing materials. After all, they’ll soak up all those kitchen smells, too. Instead, try to seal the door with weatherstripping tape and a draft blocker, and add mass with dense, non-porous materials like MLV.
But ultimately, getting a quieter appliance may be your best bet. Many companies have produced lines that promise quiet performance. Whirlpool’s Quiet Partner II dishwasher should produce only about 60 decibels. If you believe Bosch and Maytag, their 800 Series and QuietSeries are even better, only making up to 50 decibels of noise. Of course, the decibel levels aren’t the only things you should consider, but still — they’re a good start.
Final Advice
Even though having a noisy dishwasher can be incredibly annoying, you shouldn’t just insulate your problems away. If the sounds your machine is making aren’t the usual kind, you should get it serviced before attempting any of the things I’ve mentioned.
Namely, if the dishwasher is grinding instead of working smoothly or making noise when it’s off, you should address the underlying issue before making an effort to muffle it.
RELATED POSTS: