Whether you live in a house or an apartment building, you’ll find that there are plenty of benefits to soundproofing your ceilings. For one, you won’t be able to hear anything that’s happening in the space above you. Moreover, it would prevent the people who live above you from hearing what you’re up to. So with that in mind, let’s talk about how to soundproof a ceiling properly.
There are several things you should consider before implementing any soundproofing methods. Namely, you need to know the basic rules of ceiling soundproofing.

- The Basics of Ceiling Soundproofing
- 13 Effective Ways to Soundproof a Ceiling
- 1. Insulate the Ceiling Joists
- 2. Decouple the Joists From the Drywall With Resilient Channels or Hat Clips
- 3. Construct a Suspended Ceiling
- 4. Use Soundproof Drywall
- 5. Double Up on Drywall
- 6. Make Sure There Are No Cracks Between Drywall Sheets
- 7. Try Soundproof Paint
- 8. Increase the Mass of the Surface With MLV
- 9. Cover the Ceiling With Acoustic Tiles
- 10. Try Styrofoam Ceiling Tiles
- 12. Use Acoustic Foam
- 13. Try Acoustic Fabric Panels
- Soundproofing an Existing Ceiling vs. Soundproofing During Construction?
- The Best Way to Soundproof a Ceiling Against Footsteps
- How Much Does It Cost to Soundproof a Ceiling?
- How Important Is It to Soundproof Your Ceiling Against Noise?
The Basics of Ceiling Soundproofing
If you want to insulate your ceiling properly, you should understand the basic principles of soundproofing. Essentially, you have to understand which materials and techniques can conquer the different types of noise you’ll be dealing with. But as with any other soundproofing project, it’s best to start by closely examining the surface you’re working on.
Take the Type of Ceiling You Have Into Account
Most ceiling soundproofing methods should work just fine on conventional ceilings that are constructed by nailing drywall to wooden joists. However, it’s important to note that’s not the only kind of ceiling you might have in your home. For example, you could have:
- Beam ceilings, which are a traditional style that leaves heavy load-bearing beams sticking out
- Suspended or dropped ceilings that hang under the original ceiling
- Coffered ceilings that are generally made up of a grid of inset panels
- Tray ceilings with a raised center and lower sections around the sides of the room
- Coved ceiling with a curve around the edges of the room and a tall, flat section in the middle
- V-shaped cathedral ceilings with tall sloping sides that are usually found in rooms directly under the roof
- Sloped shed ceilings, though they are also found on the top story — so you won’t have to soundproof them
Aside from conventional and suspended ceilings, most of these options are constructed because of their aesthetic appeal. Needless to say, if you wanted to preserve their appearance, you’d have to approach the project from the floor above.
Identify the Type of Noise You’re Dealing With
Next up, you have to determine what kind of sound you’re most concerned about — airborne or impact noise. The main difference is that the first type carries sound through the air, which means it can sneak through the cracks in the ceiling, while the second travels through the building’s structure.
Generally, airborne noise includes human conversation, animal sounds, music, or TV noise. So if your ceiling isn’t properly sealed off, these sounds could find their way in and out of the room you’re in.
On the other hand, impact noise tends to carry lower frequencies like bass vibrations. Usually, you might feel them traveling up your building any time a heavy truck drives down your street. However, when it comes to ceilings, the most concerning kind of impact noise will come from footfall or objects falling on the floor above you.
Add Mass to Block Airborne Noise
Now that you’re aware of the two main types of noise you’ll have to contend with, you should familiarize yourself with the soundproofing principles that will help you soundproof your ceiling. To fortify your it against airborne and impact noise, you’ll want to add mass to the surface.
Heavy, thick, and dense materials can bolster walls as well as ceilings. They’ll essentially prevent sound waves from passing through the surface you’re working on. Still, when soundproofing ceilings, you won’t be able to improvise with bulky furniture. For example, you could use bookshelves and wardrobes to add mass to walls, but for ceilings, you’d have to use materials that would stay up when you install them.
Decouple Surfaces to Stop Impact Noise
Decoupling your ceiling drywall from the wooden joists it’s attached to is the best way to prevent impact noise. By attaching resilient channels to the joists, and the drywall to the channels, you can separate the two surfaces. As a result, you would reduce the transmission of vibrations between them.
Footfall from the floor above you will vibrate the wooden core of the floor but it won’t pass through to the ceiling below. In essence, the resilient channels would act as shock absorbers. However, the setup would be even more effective if you also soundproof the floor above.
Consider Using Sound-Absorbing Materials
If your main goal is to make your ceiling impenetrable to noise, you can limit yourself to using damping and decoupling techniques. However, if you also want to use that vast surface to make the acoustics within the room better, you can incorporate sound-absorbing materials as well.
If you’ve made it so sound waves can’t pass through your ceiling, they’ll probably keep bouncing around the room. If the room is large and empty enough, that will result in audio disturbances like echoes and reverberations. To prevent that, you’ll want to remove any hard surfaces from the equation, as they contribute to the cycle of sound reflection.
The principle of sound absorption requires you to use soft, dense, and thick materials like acoustic foam and fabric panels. Alternatively, there are various kinds of ceiling tiles you can use. Or if you’re more of a DIY kind of person, you can hang up blankets and call it a day.
Don’t Forget to Check the Air Vents
You wouldn’t want to go to the trouble of carefully selecting appropriate soundproofing methods for your ceiling only to find that you’ve forgotten a crucial feature of the room — ventilation. Even though most buildings have ventilation outlets on the walls, it’s not uncommon to see them in the ceiling.
And remember, if you have an open hole in the ceiling, you won’t just have to worry about noise passing down from the floor above you. Typically, ventilation networks are connected to other rooms on the same floor. So a hole in your ceiling would essentially amplify the sounds coming from the room next to you.
Don’t get me wrong — the sound that reaches you through the air duct would be quieter than the original noise. However, it would be louder than the muffled version you would have heard through a wall. With that in mind, you’ll want to identify and soundproof any air ducts you find on your ceiling while you’re dealing with the whole surface.
13 Effective Ways to Soundproof a Ceiling
The methods on this list are presented in the order you would implement them if you were starting with exposed joists. So if you want to soundproof a finished ceiling, you’ll find useful tips in the second half of this guide. Alternatively, you could always take off existing drywall and start from scratch if you feel like your current setup isn’t salvageable.
1. Insulate the Ceiling Joists
If you’ve decided to soundproof your ceiling from the inside out, the first thing you’ll need to get is insulation. There are several kinds you might consider depending on your needs and budget. However, basic fiberglass batt insulation is probably the easiest to procure and install.

Obviously, the main purpose of insulation is to capture air as it’s passing through your walls and ceilings. That makes it impossible for cold air to come in from the outside and warm air to escape from your home. But since its dense structure can capture air — which also carries sound waves — insulation provides noise control as well.
Generally, batt insulation comes in 16 or 24-inch wide rolls or rectangular batts. Measuring the spacing of your ceiling joists and calculating the total square footage you need to cover will allow you to order the exact amount of product you need. Then, when your insulation arrives, you can simply push it up between the ceiling beams. They should stay up without further intervention.
If you’re still worried about the insulation slipping out before you get the chance to put up your drywall, get the kind that has paper facing. When you stuff the insulation into the ceiling, peel away the edges of the paper and staple them to the joists.
Alternatively, you could opt for other kinds of insulation, like expanding foam or blown insulation. Loose blown insulation would only be an option if you’re planning on filling the ceiling after most of the drywall is installed. And if you want to go for the expanding foam option, you’ll want to mix it so that it sets quickly.
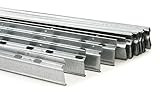
2. Decouple the Joists From the Drywall With Resilient Channels or Hat Clips
If you want to decouple your ceiling before putting the drywall up, you can use single- or double-leg resilient channels. The main difference is that you would screw single-leg resilient channels directly into the joists whereas double-leg hat channels would be clipped into place.
If you’re looking for maximum vibration reduction, most people would tell you to use hat channels. After all, they are attached to sound clips, which are in turn screwed into the joists. That is one more degree of separation in the structure of the ceiling than you can achieve through resilient channels alone. But really, you won’t hear much of a difference when you finish the ceiling.
- Decouples drywall layer from the supporting...
- Installation information provided
- Product is used to hang drywall instead of...
- For best sound isolation, Auralex recommends...
In any case, when you start installing your channels, you’ll set the first row up as close to the edge of the wall as you can get. It should be no more than six inches away, set up at a 90-degree angle to the joists. The next channel can be about 16 inches away from the first, and so on.
When you’re ready to put up the drywall, you’ll need to mark where your channels are on each sheet. While you’re at it, you can also note where the joists are so you can avoid them. If you connect the drywall to the wooden structure of the ceiling, this whole step becomes rather pointless.
3. Construct a Suspended Ceiling
Suspended ceilings are an acoustical solution that can greatly decrease both impact and airborne noise transference. You can determine exactly how low you want the dropped ceiling to be based on the height of the original one. However, you should certainly expect to lose a few inches.
Luckily, it won’t be in vain. Once you finish construction, you’ll find that the space between it and the original one is all you need to prevent noise from passing through the structure. That area, known as a plenum space, is under more pressure than the rest of the room. Its main purpose is to allow air to be circulated through the room, but it will also act as a passive sound attenuator or trap.

To create your suspended ceiling, you’ll first need to set up a level T-bar grid several inches below the original ceiling. You’ll start by installing L-shaped channels high on the walls around the whole room. After that, you’ll have to calculate what the grid needs to look like in the room based on the dimensions of your ceiling tiles or drywall.
Usually, this method goes hand in hand with acoustical ceiling tiles, which we’ll discuss later. In any case, you don’t have to finish your ceiling with acoustic tiles to have a drop ceiling. If you prefer a plain, flat finish for the surface, focus your research in that direction — and check out this video.
4. Use Soundproof Drywall
If you’re thinking about finishing your ceilings with drywall, you’ll want to choose the right kind for the job. You can use regular old plasterboard, or opt for mold-, moisture-, or fire-resistant options instead. Alternatively, you can opt for soundproof drywall, which is thicker than your average gypsum board.
Unfortunately, that solution is also more expensive than regular drywall. The overall cost will depend on the size of the ceiling, but a single sheet of soundproof drywall can cost over $40. Keeping in mind that it’ll probably be 4 feet wide and 8 feet long (or more), you can calculate how many pieces you’d need and whether the cost would be worth it. Alternatively, you can double up on regular drywall.
5. Double Up on Drywall
If you determine that buying twice as much regular drywall as you need is cheaper than getting soundproof panels, you could install two layers of the stuff. The only catch is that you’d have to connect the two somehow. But that’s where the Green Glue damping compound comes in.

Damping is a soundproofing principle in which you use substances that have the power to convert sound waves into heat. It’s a matter of translating those vibrations into thermal energy, so it may be effective for impact and airborne noise alike. However, in the case of Green Glue, you’d need to put the substance between two hard surfaces. Luckily, this product is an effective adhesive, so it’ll also fuse the two sheets of drywall.
If you decide to use this option, you’ll just need to think through the installation process beforehand. On the one hand, you could screw one sheet of drywall into your joists or resilient channels and then follow it up with another sheet covered in Green Glue. In that case, you’d need to use drywall lifts to wait until your glue sets or simply screw in the second layer too. Alternatively, you could make Green Glue and drywall sandwiches and then install them like that.
6. Make Sure There Are No Cracks Between Drywall Sheets
Once you have the drywall up, you’ll have to conceal any cracks in the surface. Most construction professionals would use gypsum joint compound to cover up the screws as well as the lines between drywall panels. However, you could also use acoustic caulk.
That product should be useful even if you’re soundproofing an already-finished ceiling. Over the years, walls and ceilings may develop cracks that could let airborne noise in and out of the room. If that’s happened in the room you’re soundproofing, you could use transparent acoustic caulk instead of joint compound.
Focus on the corners of the room where the ceiling meets the walls. As you apply the product, make sure to push it in with a gloved finger. The result will be seamless, flexible, and paintable.
7. Try Soundproof Paint
Soundproof paint is by no means a standalone product that will drastically improve the acoustic properties in your room. However, its thick and flexible texture may close off some of the tiny cracks you may have on the ceiling.
If you’ve completely rebuilt your ceiling, you could just use regular paint. Since the other layers of the surface are all new, they’re structurally sound enough to prevent any airborne noise leakage on their own. Still, if you want to seal the entire ceiling before trying the other methods, this kind of product might interest you.
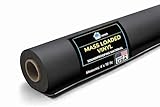
8. Increase the Mass of the Surface With MLV
If you want to add mass to your ceiling without removing the drywall, you should invest in MLV. Mass loaded vinyl is a material that will fortify any kind of surface against sound waves. However, there’s only so much it can do against impact noise on the bottom side of the ceiling.
- High-Efficiency Sound sound barrier quiet...
- Mass-loaded vinyl 1 lb sound proofing for...
- Environmentally safe - Non-toxic and...
- Improve sound quality, creating a serene...
But what if you want to use MLV to absorb shock and prevent airborne noise from passing through a ceiling? In that case, using it as a carpet underlay or floor underlayment above the ceiling would be more effective.
Of course, you could also attach the MLV directly to the ceiling. Doing so would increase the mass of the surface, making it difficult for noise to pass through. However, the material is black so you might want to cover it with fabric or ceiling tiles after you set it up.
9. Cover the Ceiling With Acoustic Tiles
There are two ways to use acoustic tiles while you’re soundproofing your ceiling. You can drop them into your suspended ceiling grid or glue them directly to the existing ceiling. Either way, they’ll add both mass and absorptive properties to the surface, preventing noise from coming in and out through that entry point.

They come in different dimensions, colors, and styles, so you can also use them to change the appearance of the room. However, I should point out that dropped ceilings should eliminate impact and airborne noise even if you construct them with other kinds of ceiling tiles. So acoustic tiles aren’t strictly necessary in that case unless you’re counting on them for absorption.
10. Try Styrofoam Ceiling Tiles
Most ceiling tiles are made of vinyl, fiberglass, clay, or materials like metal, glass, and wood. Many of those materials would reflect sound waves, which could help your cause here. However, they can also be pretty expensive. So if you’re looking for a cheap alternative — I recommend looking into styrofoam tiles.
Due to the porous nature of the material, a styrofoam-lined ceiling should decrease the sound waves bouncing around a room. But because styrofoam is much too flimsy to block noise, you’ll need another material to provide mass. One potential solution is to cover the ceiling with MLV then hide it under styrofoam tiles or use Green Glue to attach them to the drywall directly.
12. Use Acoustic Foam
If you want to prioritize the acoustic experience within the room you’re soundproofing, you could use acoustic foam panels instead of ceiling tiles. Once again, this isn’t a material you can rely on to block out noise. However, it should absorb any errant sound waves flying around the room.
Of course, if you want to add mass to the surface as well, you could put MLV between the foam and the ceiling drywall as I have previously suggested. But ultimately, acoustic foam isn’t the only professional sound-absorbing material you might use.
13. Try Acoustic Fabric Panels
If you neglected to properly insulate the inside of your ceiling, you could always add batt insulation to its surface. You just need to get some acoustic fabric panels and hang them up with impaling clips, L-brackets, or Z-clips. Alternatively, you could also build a few of these and put them all over the ceiling.

You’d just need insulation batts, a wooden frame to put them into, and plywood for the panel backing. Then, just put it all together, wrap it in fabric, and staple it in place. The best thing about this solution is that it won’t just make any space sound better — it’ll look pretty decent too! And if the ceiling you’re working on is particularly tall — enough to cause an echo — suspending the panels vertically would make them act as baffles.
Soundproofing an Existing Ceiling vs. Soundproofing During Construction?
At this point, you should have a decent grasp of the soundproofing principles you’ll use to soundproof your ceiling. However, there’s still one thing left to consider — the starting point of your project. Is it better to start soundproofing a ceiling during its construction or add materials to the finished surface?
If you’ve ever read about the process of soundproofing walls, you should know the answer to that question. Ideally, you would soundproof walls and ceilings during their construction. A fuller structure would fend off most types of noise and it would look pretty seamless too. So if you enjoy having a basic, conventional drywall ceiling, you’d have to soundproof it from within.
On the other hand, if you don’t want to deconstruct your ceiling, you could attach various soundproofing materials from below. Alternatively, if you have access to the floor above you, there are various techniques you can implement on that side of the surface.
The Best Way to Soundproof a Ceiling Against Footsteps
As you probably know by now, getting rid of impact noise is incredibly difficult. So how can you soundproof a ceiling against footsteps? Well, while decoupling the surface should work, the most effective solution is to soundproof the floor above.
Lay Down Some Carpets and Underlays
The easiest and cheapest way to prevent the sound of footfall from bothering you is to lay down some carpets on the floor above you. If the ones you have are too thin, you could either stack them on top of each other or use carpet underlays.
Memory foam underlays can absorb any kind of impact, whether it’s the result of people stomping around or objects falling. However, if you don’t find that kind, felt or rubber will do just as well. In fact, if you don’t want to invest in brand new products, try using an old exercise mat instead. The impact of footsteps will be much less noticeable in the room below.
Stabilize the Floorboards
Most kinds of flooring become loose over time, particularly in sections that get a lot of foot traffic. That tends to make the sound of footsteps much more apparent to the people in the room below. If you’re experiencing this issue, you have several solutions to choose from.
One way to deal with that would be to rearrange the furniture in a room to force people to walk on firmer ground. That solution is temporary, as it would only start the process of loosening the flooring in those other areas. But if you have wooden floorboards, you could fix the issue by simply nailing them down into the subfloor.
Install Acoustic Floor Underlayment
If you have the option of deconstructing the floor above you, do it. Placing a layer of acoustic underlayment between the subfloor and flooring will fill up and soften your floor. Moreover, doing that would take the sting out of airborne and impact noise alike.
As with carpet underlays, you’ll find that there are different kinds of floor underlayment. It can be made of foam, cork, rubber, and felt, among other materials. Ultimately, the kind you use will depend on the type of flooring you have and the room’s purpose. For example, you might have to limit yourself to using water-resistant options in bathrooms or laundry rooms.
In any case, you’ll use tape to seal the separate pieces of underlayment after you unroll the material. You could even use an underlayment with built-in adhesive on one side, which would make the process much easier. When you wrap up the installation, you’ll just have to put your flooring back at a 90-degree angle. Alternatively, you could use this as an opportunity to install new flooring.
How Much Does It Cost to Soundproof a Ceiling?
Ultimately, the cost of this particular project will depend on how thorough you want to be. Moreover, you’ll also have to take into account the condition of your ceiling. Either way, you should be able to soundproof the surface, but you’ll have to adjust your expectations if you’re working with a tight budget.
Now, you probably have some idea of how cheap/expensive it is to implement the different soundproofing methods I’ve mentioned. Still, it may come as a surprise to learn about the wide range of prices you’ll find on the market. Take underlayment, for example. Depending on the base material you choose, you’ll have to pay anywhere between $0.40 and $2.50 per square foot.
The same thing goes for insulation, though fiberglass should be about $0.65 per square foot. Then, you’d have to cover it all up with either:
- Gypsum board, which is usually about $0.20, though soundproof drywall can be as expensive as $1.40 per square foot
- Acoustic tiles, which should cost about $1 per square foot
Even if you take the cost of materials into account, you’d still have to take contractors into account. You’ll probably need to hire a crew for some of the projects I’ve suggested. However, outsourcing the job would increase the price of those acoustic tiles from a dollar per square foot to $5.
How Important Is It to Soundproof Your Ceiling Against Noise?
Ceilings are surfaces we don’t often think about in terms of soundproofing. Generally, we spend most of our time focusing on floors and walls — especially windows and doors. But if you’re stuck living under noisy people, whether they’re your neighbors or your housemates, you’ll be glad to have a soundproof ceiling.
That being said, none of this would be necessary if you can strike a deal with the people who live above you. If you don’t have to worry about loud people, your ceiling is just another potentially reflective surface in the room. So you’ll only need to cover it if you were looking to decrease the number of sound waves bouncing around.